In the last edition of USA Hockey Magazine’s Coaches
Playbook, I wrote about getting the most out of your
edges (in particular, the inside edges). In this
month’s Coaches Playbook, I will again try to answer
some more of the key questions you have about
getting the most out of your skates.
These include
skate sharpening, body positioning and where to
correctly land the blade and an exercise to improve
your edge control. Plus, in this edition, the focus
is on improving your use of Outside Edges and
learning an exercise to strengthen that edge
control.
GET ON THOSE
EDGES… PART 2:
As I discussed in last month’s article, falling down
is not only part of the game, but is an effective
learning tool … especially when you are trying to
push outside your comfort zone to develop your
skills.
Quite often,
when one of my students falls or slips, I hear them
blame their equipment. For example: “I lost an
edge” or “My skates are really dull” or “I got a
lousy sharpening”.
While all of
these explanations may have some validity, most of
the time the fall was caused by where the skater
placed his or her bodyweight relative to the blade’s
edge. That factor is much more relevant to your
success in getting power, control and a strong grip
against the ice than your actual skates.
Now, this is
not to say that you will never have a bad skate
sharpening, or that you will not fall down for what
seems like no reason at all. However, what I
generally see is that players will lose an edge
because their bodyweight is balanced over the skate
incorrectly or they are on the wrong part of the
blade.
SKATE
SHARPENING:
Speaking of
skate sharpening, I cannot tell you how many times I
am asked about this. Unfortunately, however, the
only answer that I truly feel comfortable giving is
this… ‘it is a personal thing.’
Players
should find a hollow and a skate sharpening
professional that they feel comfortable with and try
to use him or her consistently.
The best
example I can give to explain that there is no right
answer to the skate sharpening dilemma is to tell
you that every pro player I have ever coached has a
different opinion.
For example,
when I coached former NHL star Mats Naslund in
Sweden, he told me that he only gets his skates
sharpened every 3-4 games. But another of my
students, Jeremy Roenick, is very particular about
his skates and has them fiddled with constantly… it
is really a matter of taste and feel.
As far as how
deep to go with the hollow, again it is a personal
decision. But there are some rules of thumb…here’s
a few examples of the pros and cons for how sharp to
make your skates:
Arguments
for the skates not being too sharp:
1)
If you or your youth hockey player are having
trouble stopping (especially on the weaker side) you
may want to let the skates dull down or not go with
too deep of a hollow as that can hinder your ability
to slide the skate across the top of the ice.
2) If you are looking for more
glide on the ice you will likewise need to have less
of a hollow, as the deeper cut in the skate, the
more friction created with the ice… thus taking away
from your abililty to move smoothly.
3)
If you find that your legs are overly fatigued in
the third period of games for example, it is
possible that reducing the hollow in your skate will
help alleviate this problem (the theory being: less
friction with the ice, creates less work when you
skate).
Arguments
for the skates being sharper:
1)
If you are in need of a better grip when making a
turn for example, then you may want to go with a
deeper cut in the skate as this could help you
maintain a strong grip with the ice for a longer
period of time.
2)
If you are falling down a lot and it feels like the
skates are constantly sliding out from under you,
then you may want to try a deeper hollow as well to
see if that helps you with your balance.
3)
If you are a larger, stronger player, you may able
to handle a deeper cut in the skates as you then
should be able apply more mass and thus more
downward pressure into the ice.
THE OUTSIDE
EDGE:
More
important than the skate sharpening however, it is
still where you place your bodyweight over an edge
that holds the key to how it will perform for you.
And, quite often it is the upper part of the body
that is creating the most problems for you
…especially when it comes to the outside edge (for
more detail on this, see
www.robbyglantz.com to read last month’s
article where I discussed “Counterbalancing”).
Of the two
edges, the outside edge, rolled halfway to
the ice at the proper 45 degree angle (or more), is
a more difficult edge to lay down in the ice. In
order to get on an outside edge, you must have the
confidence to be able to roll your ankle outward…and
turning the ankle out is a much less natural
movement than turning the ankle in.
Body Positioning:
If you feel
like your ankle is going to cave in or that the
outside edge is going to give out from under you
when you are turning, it is more likely than not
that you are forcing too much bodyweight over the
edge. If you lean your body too dramatically over
an outside edge, it will be tough for you to
maintain the grip with the ice.
Instead, when you put the outside edge
down in the ice, it is important that you have your
hips and knees move past the edge and toward the
ice. But at the same time you will want to counter
that push in with the lower body, by maintaining
your upper body as parallel with the ice as possible
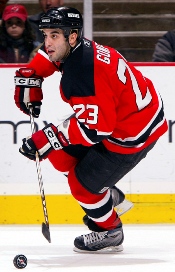
(see upper Scott Gomez photo on the right).
As you improve and gain more confidence
using the outside edge, you will be able to push the
edge harder and more effectively toward the ice, and
the way you adjust your body will become more
intuitive. When you get to this point, you know
that your muscles are beginning to learn the lessons
that you are teaching them… this is called
“muscle memory.”
Blade
Placement on the Ice:
How you place
any edge on the ice is a vital factor in your
ability to use it efficiently. This is especially
true in regards to the outside edge, where you have
less margin for error than on the inside edge.
To help you
better understand where and how to put the skate
properly down on the ice, it is good to think of the
blade as three separate parts: Front-Middle,
Middle-Middle and Back-Middle.
You will use
all these parts of the blade depending on what
skating maneuver you are doing. For example, a
quick start comes from the front-middle of your
blade. As well, a quick turn in a short area
(especially at lower speeds) can come from the
back-middle of the blade.
But for the
best success in improving and holding an outside
edge, you will want to use the middle-middle of your
blade. This gives you the most stability and
control
(see lower Scott Gomez photo on the right).
If you apply
too much pressure to the front-middle of an outside
edge, it becomes virtually impossible to maintain
it.
To test this,
try building up speed around a circle and then glide
only on your outside edge (one foot). Place the
skate down incorrectly, with too much weight toward
the toe, and you will see how this will cause you to
come off the edge and lose your balance forward…
Not even Scott Gomez could hold an outside edge,
while on one foot, with his weight on the toe of his
skate!
Then, skate
around the circle again and this time land the
outside edge correctly in the middle of the blade
getting as much of it as possible in contact with
the ice and it should be clear to you where the most
stability will come from…. directly in the middle
of the blade
OUTSIDE EDGE
DRILL
Drill:
Outside Edge to Outside Edge Crossovers.
Techniques:
· The
drill goes from one goal line to the other.
· Start
by pulling your right foot over and in front of your
left foot.
· Your
left skate should be planted on an outside edge,
with the edge at least halfway to the ice.
· Hold
and glide on your outside edge for a beat or two, or
until you have formed a half-moon in the ice.
·
Cross your left foot under the body, to full
extension, thrusting against the ice to pick up
speed.
· Then,
you will switch over and do the drill on the other
side, this time landing on the right skate…make sure
it comes down on a solid outside edge as well.
· Now
bring the left foot around in front of the right and
repeat the crossover motion described above.
· Keep
changing from one outside edge to the other,
building up speed with each Crossunder push (while
not shortening the time you are on the edge on one
foot), until you get to the far goal line.
· Tip:
As mentioned earlier in this article, be sure to
land on the middle of your outside edge… landing too
close to the toe will make you come off the edge and
fall forward… and likewise, landing too far back on
the heel will cause you to rock backward and lose
momentum.
Body Positioning in the Drill:
· With
the eyes straight ahead (not looking down or
hunching forward), lean the upper body forward with
the back of your helmet in front of your glide knee.
· Bend
the knees deeply to get the most out of your leg
muscles.
· Roll
the skate, at the ankle, to an outdise edge halfway
to the ice (45°)
for proper
grip.
· Apply
downward pressure into the middle of the blade (not
the toe or heel), so the outside edge will hold
throughout the turn.
· Be
sure to push the Crossunder to full extension as
this will help you practice not only your edge
control, but also the motion you use when turning.
See you at the Camps…